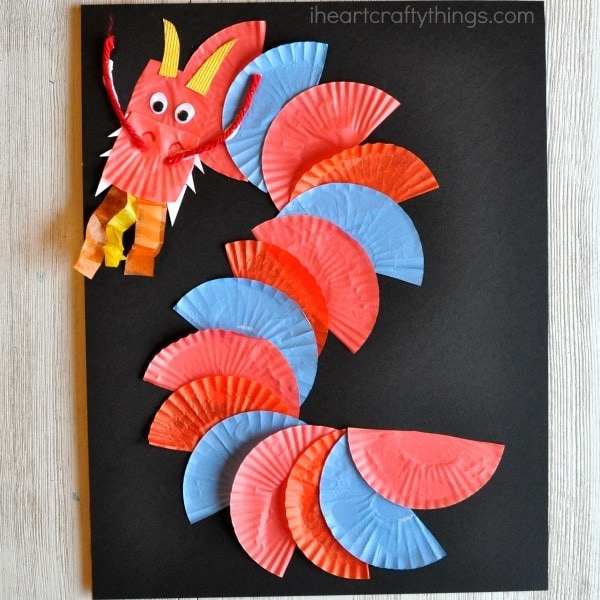
Kindergarten- Dragons from iHeartCraftyThings
Supplies:
- black cardstock
- mini cupcake liners (We used red, orange and blue but you can use any colors you want to.)
- googly eyes
- gold and white cardstock
- red yarn
- orange and yellow tissue paper
- red marker
- scissors
- glue
Step 1: Begin by cutting about eight mini cupcake liners in half. Glue one of the cupcake liner halves onto your black cardstock paper, towards the top with the round curve pointed at the left of the page. This is the start of your dragon body. Continue gluing and layering the cupcake liners halves down your page to form your dragon body. You can add a curve in your dragon of leave it straight down the page, it’s up to you.
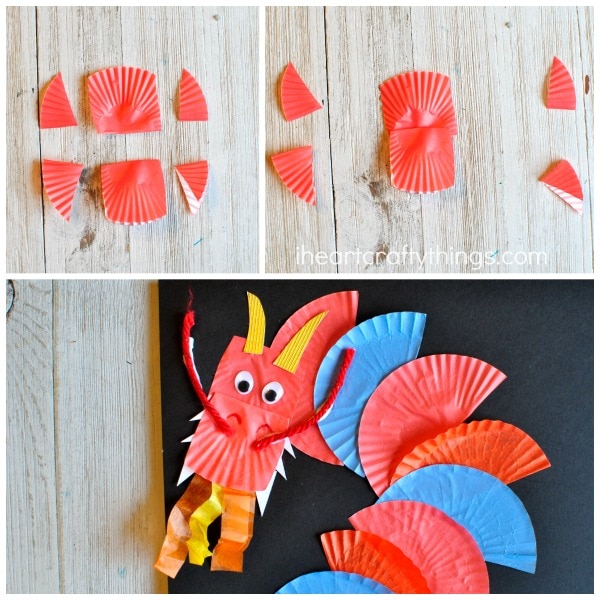
Step 2: Now make your dragon head. You’ll need two cupcake liners. Cut one of them in half (discard the other half) and fold the other liner in half. Cut the sides off of both of these pieces (see picture below). Glue the two pieces together to make a dragon head making sure the folded section opens and closes at the bottom of the face.
Step 3: Glue your dragon head onto the front of your dragon body. Cut horns from your gold cardstock and glue them onto your dragon. Cut out white teeth and glue them on the inside of the dragon mouth.
Step 4: Cut out a few small pieces of orange and yellow tissue paper and glue them onto the inside of your dragon mouth. Crinkle the ends of the tissue a little to look like fire coming out of the dragon’s mouth. Add a bit of glue on top of the tissue paper and glue the dragons mouth shut.
Step 5: Finish your cupcake liner dragon craft by drawing nostrils on your dragon with a red marker and then glue two short strands of red yarn coming off of the dragon face like long whiskers.
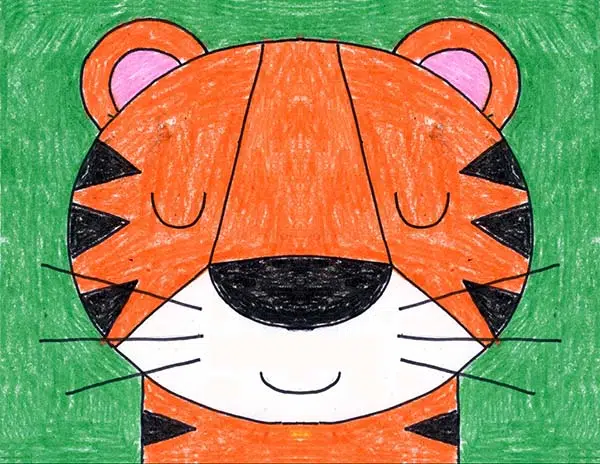
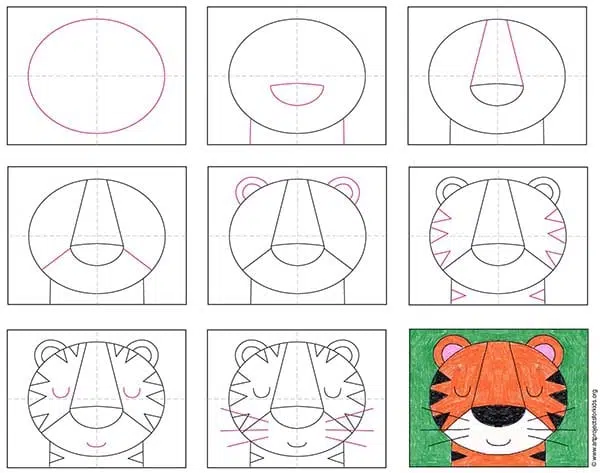
First Grade- Tiger Guided Drawing from artprojectsforkids.org
Supplies:
- Pencil
- Eraser
- Black sharpie
- Crayons
- White construction paper
Use the step by step illustrations below to guide the students in their tiger drawings.
Second Grade- Tiger in the Jungle from Kathy’s Art Project Ideas

Supplies:
- Pencil
- Eraser
- Watercolor paper
- Watercolor paints
- Tissue paper
- Glue stick
Step 1: Show the students a few examples and then do a directed drawing of the Tiger in pencil on Watercolor Paper. It’s pretty simple if you break it up into simple shapes: a circle for the face, rounded triangles for the ears, triangle for the nose, etc…
Step 2: Discuss what parts of the tiger are white and what parts are orange, also the stripes down the forehead, across the cheeks and across the chest.
Step 3: Next they’ll outline their final drawing with black sharpie and then using just the orange, paint the outside of the ears, the face and chest, leaving the appropriate areas white.
Step 4: After the orange is dry they can go in with black paint on a fine tip brush and go over the stripes with a ziggy zaggy brushstroke. While they are waiting for the orange to dry we’ll cut some leaves and flowers out of tissue paper.
Step 5: The final step is to use a glue stick and tissue paper to surround their tiger with jungle foliage.
Third & Fourth Grades- Symmetrical Tigers from dolvinartknight blogspot

Supplies:
- Pencil
- Eraser
- Construction paper
- Tempura paint
Step 1: First fold the paper in half (top to bottom with the paper vertical).
Step 2: Lead students in a guided drawing (or let them try on their own) to draw half of the tiger head on one side of fold.
Step 3: Because the tempera dries quickly on the construction paper, use a quick rhythm of painting just a few strokes and then printing – “paint a little, print a little.” (Example in image below.)

Step 4: Students continue painting with the orange and black and “print” as they go.
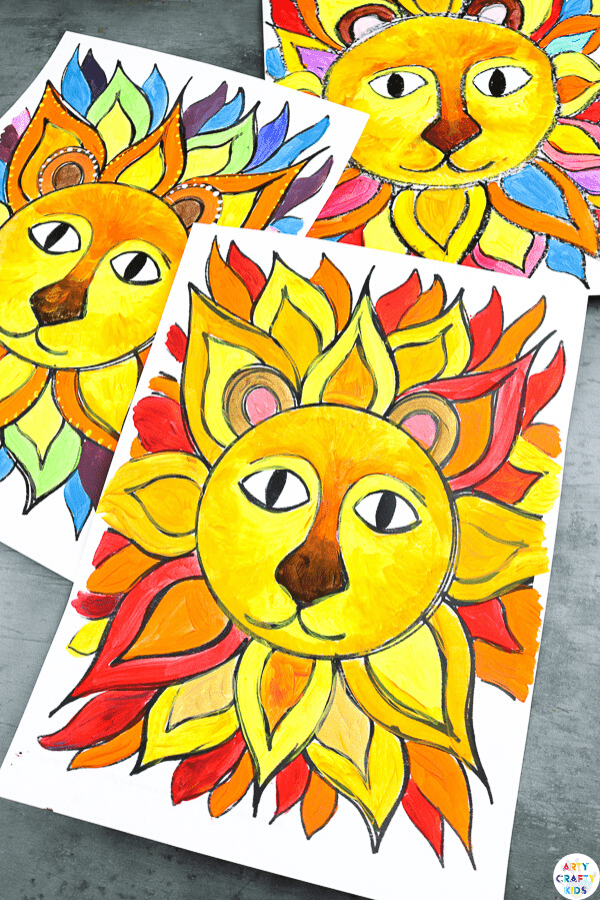
Fifth Grade- Sunshine Lion from artycraftyklids.com
Supplies:
- White cardstock
- Oil Pastels
- Acrylic or watercolor paints
Step 1: Start by drawing a large circle roughly in the middle third. The circle needs to be big, but also needs to leave room for the lovely sunny mane that goes around it.
Step 2: Then begin the face with eyebrows and a nose. Starting on the left hand side towards the top, draw a line across towards the middle and down, almost like a curved number seven. Then do the same on the other side: start towards the top on the right hand side, draw a line in towards the middle and down. Complete the lion’s nose by drawing a diamond shape connecting the bottom of the two lines.
Step 3: Under each eyebrow, draw a large oval eye and, since this lion is friendly, give him a big smile coming down from the bottom of his nose. Draw two small rounded ears at the top of his head.
Step 4: Then we’re ready to begin the mane! Draw a large petal shape at the bottom of the head by flowing down, out and in to a point; then up, out and back in to the head. Then repeat this large petal shape at the top of the head, and on the left and right sides. Repeat the same shape, but slightly smaller, inside each petal so they start to look like the flame from a fire.
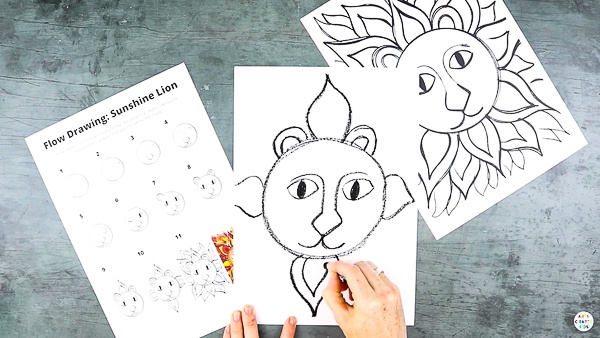
Step 5: Now start to fill in the gaps with more petal shapes to create a full fiery mane. Once you’ve finished the first layer around the head, create a second layer by filling the gaps in between the first. We want to create lots of depth, so add as many layers as you can fit onto the page.
Step 6: Let’s bring the lion to life! Use your brightest paints and all of your wonderful creativity to color your lion. You can just use shades of red, orange and yellow to really mimic that sunshine feel, or use the whole color palette to create a rainbow sunshine lion – why not?!